About Me

My photo
"Harmony & Contrast!! - all beauty comes from these two"

Saturday, December 15, 2018

Macro Photography with iPhone and a Macro Lens


It's so amazing that in a short span of decade or so phone photography has made such a huge leap. The smart phone cameras today give entry level DLSRs run for their money. I have numerous examples of photos where my iPhone camera was able to capture dynamic range better than my $10K full frame camera/lens combo. But that's another blog, another time. These days phone cameras come with the capability to capture landscape, panorama, portrait and low light modes to name a few. What I wanted to here explore is - can the phone camera do macro photography? 

As some of you may know I have been doing phone photography as a hobby (besides a paid side gig every once in a while for some in-flight magazines for some international carriers). You can find my phone photography gallery in Instagram link below.

https://www.instagram.com/neupaneaj_iphone_gallery/

When I say "phone photography" I should clarify that I have the only phone photography I have done is with iPhones. Starting all the way from iPhone 4 back in 2010. That was the first time I thought I don't have to carry my DSLR all the time. These days except for my specific photographic excursions/trips I rarely take DSLR with me. 

Back to the Macros photography - these is one genres of the photography a lot of people are not familiar with neither care to -  and me included!!! Lately, what had piqued my interest on it was when I was taking photos of micro-electronics with my phone at my work -  as an aid to troubleshooting in solving engineering issues. I was taking photos of tiny solder joints to see if there were any cracks or defects. I realized, gone are the days before phone cameras, when you had to bring the specimens to some expensive microscope with optical mage capture capability.  (But don't get me wrong you steel need to use those if you need to magnify the object lets say 10X to 20X or more.)

Macro photography starts at least with 1:1 ratio or higher on object to photo.  To go to higher magnification you need special macro lenses - no different than different object lens in microscope in technical sense. 


Below is my set up for this exercise. 

iPhone 7+ on my hand. Sunny day, inside my apartment. Plenty of natural light.


For the object, a small insect or bee or water drop on leaf would have been good - but where am I going to find such things in  this concrete jungle of downtown Bangkok. 

Instead, I chose 5 colorful beans - white, black, red, green, and orange ones - something I could find in my tiny apartment readily that is!! These small, colorful three dimensional objects with some texture were perfect for this purpose I thought.     

Then I choose a freshly chiseled pencil tip and placed next to the row of beans to give a sense of scale. The texture on lead tip of the pencil turned out be an added bonus for comparison purpose.
I decided to place them on a textured ottoman as a background to add more complexity. I wanted to see if camera would pick up the textured background or the objects for focusing.   

As for lens I got this shown in pic above. This came as a freebie when I had bought a HTC phone as a gift for someone. It does not have any spec - just says macro lens. Not any different than typical lens set  (macro, wide, zoom) you seem to get for phone cameras accessories everywhere these days. 

Not let's get started.

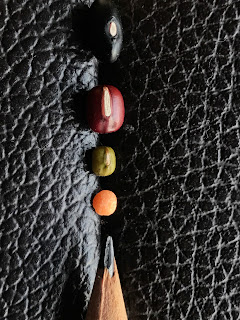
In this pic below I wanted see how close can I get to the object and still be on focus. I am about 7 cm high. I can't focus properly. To focus I need to move camera higher (further away) from the object. This is just point an shoot without any light or focus adjustment, You have a dark background and white object - this is where camera make tend to over or underexpose trying to find a balance.  In that sense below pic is no different -  whites and highlights are overexposed. 

f/1.8, 1/20 Sec, ISO-40, Exp Comp 0, FL 28 mm,

How much do I need to move it away get everything in focus - about 10 cm in pic below!!! Plus I tried to adjust the exposure compensation by tapping on the white chick pea. Highlights are nicely exposed but the dark background seem a little underexposed. The details are most probably still there - meaning if you post process this on any photo editor app like PS express or Camera+ the dark background details can be brought to light.

As experts say if you are pressed between under exposing or over exposing when you have very light and dark subjects in same frame go with slightly underexposed and process it later. On overexposed details are lost forever whereas on underexposed, the details may be are still there. But again that's another topic, another forum and there's hundred of material on over and under exposure in the web already.

For a given iPhone 7+ camera with a sensor size of 4 by 7.21 mm you are capturing the image below that's about 5 by 10 cm with the magnification ratio of   1:10 and the closest you can be from the object is about 10 cm and still have object in focus. 


f/1.8, Exp 1/50 Sec, ISO-32,  Exp Comp -1, FL 28 mm

If you go 2x optical Zoom available in iPhone it will be out of  focus and you have to move to about 15 cm. While the exposure looks a little worse (about .1 lower than above - I could have adjusted a little better) clarity might be a tad bit better. Although that could be because the field of view in smaller now  - hence features are more zoomed in.

f/1.8,1/33 Sec, ISO-25, Exp Comp -.9, FL 63 mm

And if you zoom 3X,  you need to be 17 cm away. Not sure the photo is any better than 2X. You need to back up further - which means loosing clarity. This was just to see what-if.
                         f/1.8, Exp 1/33 Sec, ISO-25,  Exp Comp -.9,  FL 97 mm

And below is in  Macro mode in Camera+ App. Height of 7 cm. Photo looks very sharp and exposure is good.
               f/2.8, Exp 1/33 Sec, ISO-20,  Exp Comp No Info, FL no info. 

Below is with Macro lens - that allows you  to shoot from 5 cm away at normal setting. Not sure photo is any better - but the field of view is narrow.

                                    f/1.8, Exp 1/33 Sec, ISO-40,  Exp Comp 0, 35 mm FL 28 mm


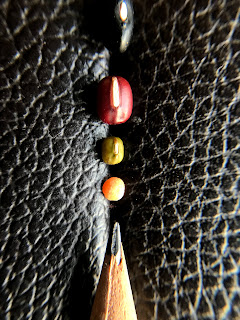
Finally this one is with macro lens and Camera+ App both. This required me to get very close the object. Camera is just 2 cm away and look at my field of view!! It's about 2 -3 cm only. Colors and textures are very good compared to all previous set ups.

                              f/3.8, 1/50 Sec, ISO-32,  Exp Comp No Info, FL No Info

Now let's put is all together and compare.

Let's select 5 set up from above for comparison purposes.

A - Point and shoot in normal mode. Moved camera back until objects looked focused. Tap on over exposed area for exposure compensation.
f/1.8, 1/50 Sec, ISO-32,  Exp Comp -1, 35 mm FL 28 mm, FOV~ 15 cm, Camera Dist. 10 cm

B - Use 2X optical zoom. Make use of the secondary/portrait lens - let's-see-what-it-does!!
f/1.8, 1/33 Sec, ISO-25, Exp Comp -.9, 35 mm FL 63 mm, FOV~ 10 cm, Camera Dist. 15 cm

C - Use Macro mode on Camera+ App. 
f/2.8, 1/33 Sec, ISO-20,  Exp Comp no info, FL no info., FOV~ 7 cm, Camera Dist. 7 cm

D -  Use a run of the mill "Macro" lens that you see everywhere as a phone camera accessory
f/1.8, 1/33 Sec, ISO-40,  Exp Comp 0, FL 28 mm, FOV ~ 5 cm, Camera Dist. 5 cm

E - Use Macro Lens and Macro Mode on Camera+ App 
f/3.8, 1/50 Sec, ISO-32,  Exp Comp No Info, FL No Info, FOV ~ 3 cm, Camera Dist. 2 cm!!!

For comparison purpose I adjusted (cropped and zoomed) all the photos same as the last photo (Setup E above where I was only about to capture only about 3 cm). Then you are looking at the same photo size and same field view - just comparing clarity.


I ranked each photo in terms of clarity. Remember just clarity only. Rank would change if you look in terms of exposure.

Starting from left in terms of clarity, even for macro photography 2X lens Setup B seem to do a little better job compared to standard no zoom Setup A. Although exposure is better on Setup A.

Setup C, to my surprise, when I zoomed and cropped, is the clear winner here. I thought setup looked very good. Remember set up E is the original image without any zoom or crop. Comparing this to Setup C's original image (that you can see up above, without any zooming to same FOV as Setup E) looked inferior. It's only when you crop and zoom Setup C photo same as Setup E photo, you notice that clarity is all there.

Setup D with Macro lens alone, which is supposed to give you "Macro" photo without the software manipulation as Setup C actually is slightly inferior compared to Setup C and D. 

Setup D (and E for that matter) both with the Macro Lens just give you the illusion of  Macro photo by just narrowing the field of view. The clarity is not necessarily any better when you zoom it compared to the one without the lens.


Conclusion:
Not sure if the macro lens is doing any better job.  Use Camera+ App on Macro mode.


Thursday, May 18, 2017

Luang Prabang


Looking over into the east end of the town from Phousi Hill. Later afternoon with patchy clouds.

Mekong River as seen from Phousi Hill - sun was setting soon.

Look at them dramatic cluds - Mekong River as seen from Phousi Hill

This is Nam Khan river which soon joins the mighty Mekong in less than a kilometer behind you. You can see the main drag through town and the yellow temple that caught my attention.


This temple sits on a foothill on ease end of town and can be clearly seen from most places as seen in previous photo. We decided to check it out. We though it would packed with tourists but we were the only one. 

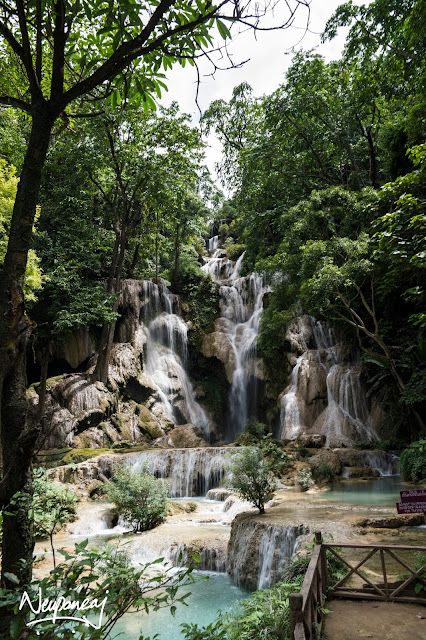
This is Kung Si waterfall. About an hour of hike from the nearest road. I was simply blown away. This is the most beautiful waterfall I have been to date. It was a visual feast. Took loads of pictures.

This type of temple defines Luang Prabang and most of Laos.

Entrance to the museum.  Nothing in terms of photo subject or composition really!!! Just a tourist shot to claim been there done that I guess.

Inside the museum grounds. Again, one of those touristy photo. Not much of composition.


Kung Si Water was a visual feast. 


Back in town. Another look of the town from Phousi Hill. You can see Nam Khan River and the yellow temple I mentioned above.


This temple with red wall and bright shiny probably defines Lunag Prabang. 


One more pic of the Kung Si Falls. Couldn't get enough of it!!!

Saturday, November 8, 2014

Poon Hill Express

Can one wake up in KTM at  600 AM; catch a 720 AM flight to PKR landing 20 mins later; hire a taxi right outside of the airport to get to Naya Pool by 10 AM; pick up a guide and a 4 by 4 jeep in minutes time along the way; drive up to Hile lasting 45 mins or so, then hit the trails; stopping for lunch at Ulleri then reach Ghorepani comfortably by 6 PM; go see the sunrise at Poon Hill the next morning; and trace it back to PKR same day; hike back down Ulleri catching the jeep back to Naya Pool and then to PKR; wingin' the hole trek in 2 days that used to take 5 days??? Is it possible. It actually is. I was with my partner and she just wanted to see the Himalayas from Poon Hill - hence!!!!

That is why naming this photo blog "Poon Hill Express" seems fitting. This could open up a whole new trekking idea for a certain group of tourists   (you know who!!!) who just want to get the selfies taken with Himalays in the backdrop and get back to their daily lives of McNuggets, tall Lattes and Snapchats in no time. Instant gratification is the new norm folks. Who has time??  Cable Car directly to ABC or EBC anyone? Just kidding. But Poon Hill with the altitude of  barely 11000 feet makes it possible for such a quick trip for there's little to no risk of altitude sickness. 

I have trodden these trails of Annupurna region before - so in terms of excitement it was not as much as when I was there back in 2011 - but Himalayas are always breathtaking, no matter what. What chronicles below is my photographic journey; what appeared before me as I put one foot in front of another to get there. My journey actually begins a day earlier in KTM.   No day by day account. Just some ramblings on the photos I took. Hope you like it. Click on any of the pics for larger views. 


What remains of once a lush green KTM valley! One can still see some patches of green and yellow  (mustard flowers and rice paddy mostly) here and there like these once you go to the valley perimeters. You can also see the KTM Airport runway near upper middle left of the photo. That was completely unintentional but once I was going through the photos noticed it. It was a misty morning. Hence the photo is not as sharp specially capturing hills on the background.   


Had it been manged well KTM valley could have been the one of most picturesque city in the world. This photo shows south east corner of the valley where it is not totally covered with ugly concrete buildings yet. But sadly  speaking- give another 10 years and ever expanding humanity will have ruined this place as well - with little to no government restrictions on who can build what and where.


A typical Nepalese woman you get to see on the outskirts of the valley. Less jeans and t-shirts and more traditional upkeep. She was chillin' at a temple that I was went to see called Santenswor - which sits on a top of a hill. She was friendly and did not mind me taking her photographs. I took other shots where she was smiling a bit more (and with no shadows on the face) but I chose to feature this photo because it had more character.


 God Dude!!!
Isn't it though?? If there ever was one.☺


I was pleased with this photo - I had forgotten to take along my full frame camera when I decided to visit this Swyambhunath temple at night. I used you my iPhone instead - and did a long exposure shot. For this long exposure to work I needed no monkeys bouncing around on the Stupa dome (which they were just moments earlier) and no selfie taking crowds photo bombing my frame. Notice the colorful prayer flags unfurled in light evening breeze. 

Nope it's not a poor WB setting but a rainbow as I was hiking up the steps of Ulleri. Rain had just stopped (at least where I was) and got to see this as I was trying to look for fishtail (Machhapuchhre) mountain on the horizon. On a hindsight I should have backed up my focal length a little to capture more of the mountains as a backdrop.


And a short while later clouds cleared just briefly enough to capture Mt. Machhapuchhre. Conditions were not ideal at all to capture any better shot than this  late in the  evening.


But conditions were decent for a close up photo. This our porter/guide Dai we picked up at Naya Pool. A humble and hardworking man in his mid 50s. We were happy to have met him and used his services.


People go to Poon Hill to see sunrise over Himalayas. This is Annapurna range with Machhapuchhre at the dawn break. As I would learn looking at my photos later -  morning time is not the best time to take photograph specially on a back light situation and with lot of moisture and fog in the atmosphere. You could own a Hasselblad and not do much with it - as it seemed.


 One might say you went all the way to Annapurna and got this lousy shot of Machhapuchhre?? Yup that morning there was not much option - again with the back light and misty morning. This mountain dominates the landscappe in Annapurna region similar to Amadablam in Everest region.


Start to see sun on Dhaulagiri Peak - world 7th highest mountain and tallest in this region. This moutain with its south face like a broad chest of a heavy weight wrestler looks rather intimidating. It looks a lot bigger than what this Panoramic Scale photo shows. See a photo taken in with 50 mm lens near the end below to get more realistic perception.


Sun started to sparkle top of Mt. Dhaulagiri more rapidly as sun rose through the horizon.
Switched to my favorite 135 mm/1.8 mm Carl Zeiss lens - this lens to me is never disappointing. For a such a low light and misty condition  - this lens would outdoes any so called high end Nikon and Cannon stuff out there.


This is South Annapunra - Himchuli Peak. Look at the color!!  Local sherpas call it  a Hikers Peak or a Day Peak. Sure - sign me up!!!


This is Mt. Dhaulagiri with it's little brother Tukche Peak


Same peaks about an hour later when sun was high in the sky. 


This was in Ghorepani. I saw this Gurung Dai with his little daughter inside a little pub called "Vatti" where porters stop by to "hoist a little". He didn't know I took this shot at first. I showed it to him and he shook his head liking what he saw.


Dhaulagiri range from almost at the bottom of Poon Hill with rhododendron bush in the foreground. I have heard that trekking is spring is really colorful. May be someday!!! This is with 50 mm lens - gives a more realistic perspective of how close this mountain looks.


Himchuli near bottom of Ghorepani as captured with my iPhone.


I tried the long exposure on this mountain stream just below Ghorepani but really didn't have a good angle unless I climbed down this steep stream.


An unmotivated mule - just chillin' on a mid-day sun


I tried to merge two photos taken earlier using PS. Not too bad of a result.


Another unmotivated mule - at steps of Ulleri - an iPhone shot


The instrument he is playing is called "Sarangi" - Nepalese violin that goes back centuries.  He makes them, plays them, sells them, sings along while playing them, sells CDs with his songs on them,  and he carries everything he sells in a big a duffle bag as he loiters on the banks of Fewa lake. It's a one man music industry - a nifty little entrepreneurship he got going. Hope what he earns make a decent living.


Nah - she was not posing for my photo - she was looking at me to see if I would buy her papaya as I sat on one of the outdoor bars  sippin' beer on the banks of Fewa lake  while shamelessly shooting anything that moved with my telephoto lens without moving the butt off the chair after two days of grueling hike. 


Story with this dude is that he is from India and was collecting "donations" so he could make a pilgrimage to Mukinath - near Jomsom between Dhaulagiri and Annapurna range. 

Oh what a cool customer she was!! She saw with my big lens from a far away and blew a kiss as she passed by. Did not have time to adjust - just took this shot in a hurry. 


Shot of Fewa lake, Captures the mood.


Thank you for visiting my page. See you on the trails!!!