
It's so amazing that in a short span of decade or so phone photography has made such a huge leap. The smart phone cameras today give entry level DLSRs run for their money. I have numerous examples of photos where my iPhone camera was able to capture dynamic range better than my $10K full frame camera/lens combo. But that's another blog, another time. These days phone cameras come with the capability to capture landscape, panorama, portrait and low light modes to name a few. What I wanted to here explore is - can the phone camera do macro photography?
As some of you may know I have been doing phone photography as a hobby (besides a paid side gig every once in a while for some in-flight magazines for some international carriers). You can find my phone photography gallery in Instagram link below.
https://www.instagram.com/neupaneaj_iphone_gallery/
When I say "phone photography" I should clarify that I have the only phone photography I have done is with iPhones. Starting all the way from iPhone 4 back in 2010. That was the first time I thought I don't have to carry my DSLR all the time. These days except for my specific photographic excursions/trips I rarely take DSLR with me.
Back to the Macros photography - these is one genres of the photography a lot of people are not familiar with neither care to - and me included!!! Lately, what had piqued my interest on it was when I was taking photos of micro-electronics with my phone at my work - as an aid to troubleshooting in solving engineering issues. I was taking photos of tiny solder joints to see if there were any cracks or defects. I realized, gone are the days before phone cameras, when you had to bring the specimens to some expensive microscope with optical mage capture capability. (But don't get me wrong you steel need to use those if you need to magnify the object lets say 10X to 20X or more.)
Macro photography starts at least with 1:1 ratio or higher on object to photo. To go to higher magnification you need special macro lenses - no different than different object lens in microscope in technical sense.
Below is my set up for this exercise.
iPhone 7+ on my hand. Sunny day, inside my apartment. Plenty of natural light.


For the object, a small insect or bee or water drop on leaf would have been good - but where am I going to find such things in this concrete jungle of downtown Bangkok.
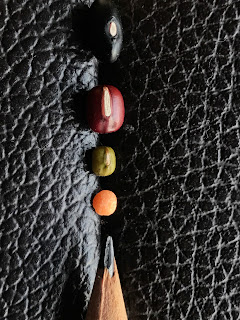
Instead, I chose 5 colorful beans - white, black, red, green, and orange ones - something I could find in my tiny apartment readily that is!! These small, colorful three dimensional objects with some texture were perfect for this purpose I thought.
Then I choose a freshly chiseled pencil tip and placed next to the row of beans to give a sense of scale. The texture on lead tip of the pencil turned out be an added bonus for comparison purpose.
I decided to place them on a textured ottoman as a background to add more complexity. I wanted to see if camera would pick up the textured background or the objects for focusing.
As for lens I got this shown in pic above. This came as a freebie when I had bought a HTC phone as a gift for someone. It does not have any spec - just says macro lens. Not any different than typical lens set (macro, wide, zoom) you seem to get for phone cameras accessories everywhere these days.
Not let's get started.
In this pic below I wanted see how close can I get to the object and still be on focus. I am about 7 cm high. I can't focus properly. To focus I need to move camera higher (further away) from the object. This is just point an shoot without any light or focus adjustment, You have a dark background and white object - this is where camera make tend to over or underexpose trying to find a balance. In that sense below pic is no different - whites and highlights are overexposed.

f/1.8, 1/20 Sec, ISO-40, Exp Comp 0, FL 28 mm,
How much do I need to move it away get everything in focus - about 10 cm in pic below!!! Plus I tried to adjust the exposure compensation by tapping on the white chick pea. Highlights are nicely exposed but the dark background seem a little underexposed. The details are most probably still there - meaning if you post process this on any photo editor app like PS express or Camera+ the dark background details can be brought to light.
As experts say if you are pressed between under exposing or over exposing when you have very light and dark subjects in same frame go with slightly underexposed and process it later. On overexposed details are lost forever whereas on underexposed, the details may be are still there. But again that's another topic, another forum and there's hundred of material on over and under exposure in the web already.
For a given iPhone 7+ camera with a sensor size of 4 by 7.21 mm you are capturing the image below that's about 5 by 10 cm with the magnification ratio of 1:10 and the closest you can be from the object is about 10 cm and still have object in focus.

f/1.8, Exp 1/50 Sec, ISO-32, Exp Comp -1, FL 28 mm

f/1.8,1/33 Sec, ISO-25, Exp Comp -.9, FL 63 mm
And if you zoom 3X, you need to be 17 cm away. Not sure the photo is any better than 2X. You need to back up further - which means loosing clarity. This was just to see what-if.

f/1.8, Exp 1/33 Sec, ISO-25, Exp Comp -.9, FL 97 mm

f/1.8, Exp 1/33 Sec, ISO-40, Exp Comp 0, 35 mm FL 28 mm
Finally this one is with macro lens and Camera+ App both. This required me to get very close the object. Camera is just 2 cm away and look at my field of view!! It's about 2 -3 cm only. Colors and textures are very good compared to all previous set ups.

f/3.8, 1/50 Sec, ISO-32, Exp Comp No Info, FL No Info
Now let's put is all together and compare.
Let's select 5 set up from above for comparison purposes.
A - Point and shoot in normal mode. Moved camera back until objects looked focused. Tap on over exposed area for exposure compensation.
f/1.8, 1/50 Sec, ISO-32, Exp Comp -1, 35 mm FL 28 mm, FOV~ 15 cm, Camera Dist. 10 cm
B - Use 2X optical zoom. Make use of the secondary/portrait lens - let's-see-what-it-does!!
f/1.8, 1/33 Sec, ISO-25, Exp Comp -.9, 35 mm FL 63 mm, FOV~ 10 cm, Camera Dist. 15 cm
C - Use Macro mode on Camera+ App.
f/2.8, 1/33 Sec, ISO-20, Exp Comp no info, FL no info., FOV~ 7 cm, Camera Dist. 7 cm
D - Use a run of the mill "Macro" lens that you see everywhere as a phone camera accessory
f/1.8, 1/33 Sec, ISO-40, Exp Comp 0, FL 28 mm, FOV ~ 5 cm, Camera Dist. 5 cm
E - Use Macro Lens and Macro Mode on Camera+ App
f/3.8, 1/50 Sec, ISO-32, Exp Comp No Info, FL No Info, FOV ~ 3 cm, Camera Dist. 2 cm!!!
For comparison purpose I adjusted (cropped and zoomed) all the photos same as the last photo (Setup E above where I was only about to capture only about 3 cm). Then you are looking at the same photo size and same field view - just comparing clarity.

I ranked each photo in terms of clarity. Remember just clarity only. Rank would change if you look in terms of exposure.
Starting from left in terms of clarity, even for macro photography 2X lens Setup B seem to do a little better job compared to standard no zoom Setup A. Although exposure is better on Setup A.
Setup C, to my surprise, when I zoomed and cropped, is the clear winner here. I thought setup looked very good. Remember set up E is the original image without any zoom or crop. Comparing this to Setup C's original image (that you can see up above, without any zooming to same FOV as Setup E) looked inferior. It's only when you crop and zoom Setup C photo same as Setup E photo, you notice that clarity is all there.
Setup D with Macro lens alone, which is supposed to give you "Macro" photo without the software manipulation as Setup C actually is slightly inferior compared to Setup C and D.
Setup D (and E for that matter) both with the Macro Lens just give you the illusion of Macro photo by just narrowing the field of view. The clarity is not necessarily any better when you zoom it compared to the one without the lens.
Conclusion:
Not sure if the macro lens is doing any better job. Use Camera+ App on Macro mode.
No comments:
Post a Comment